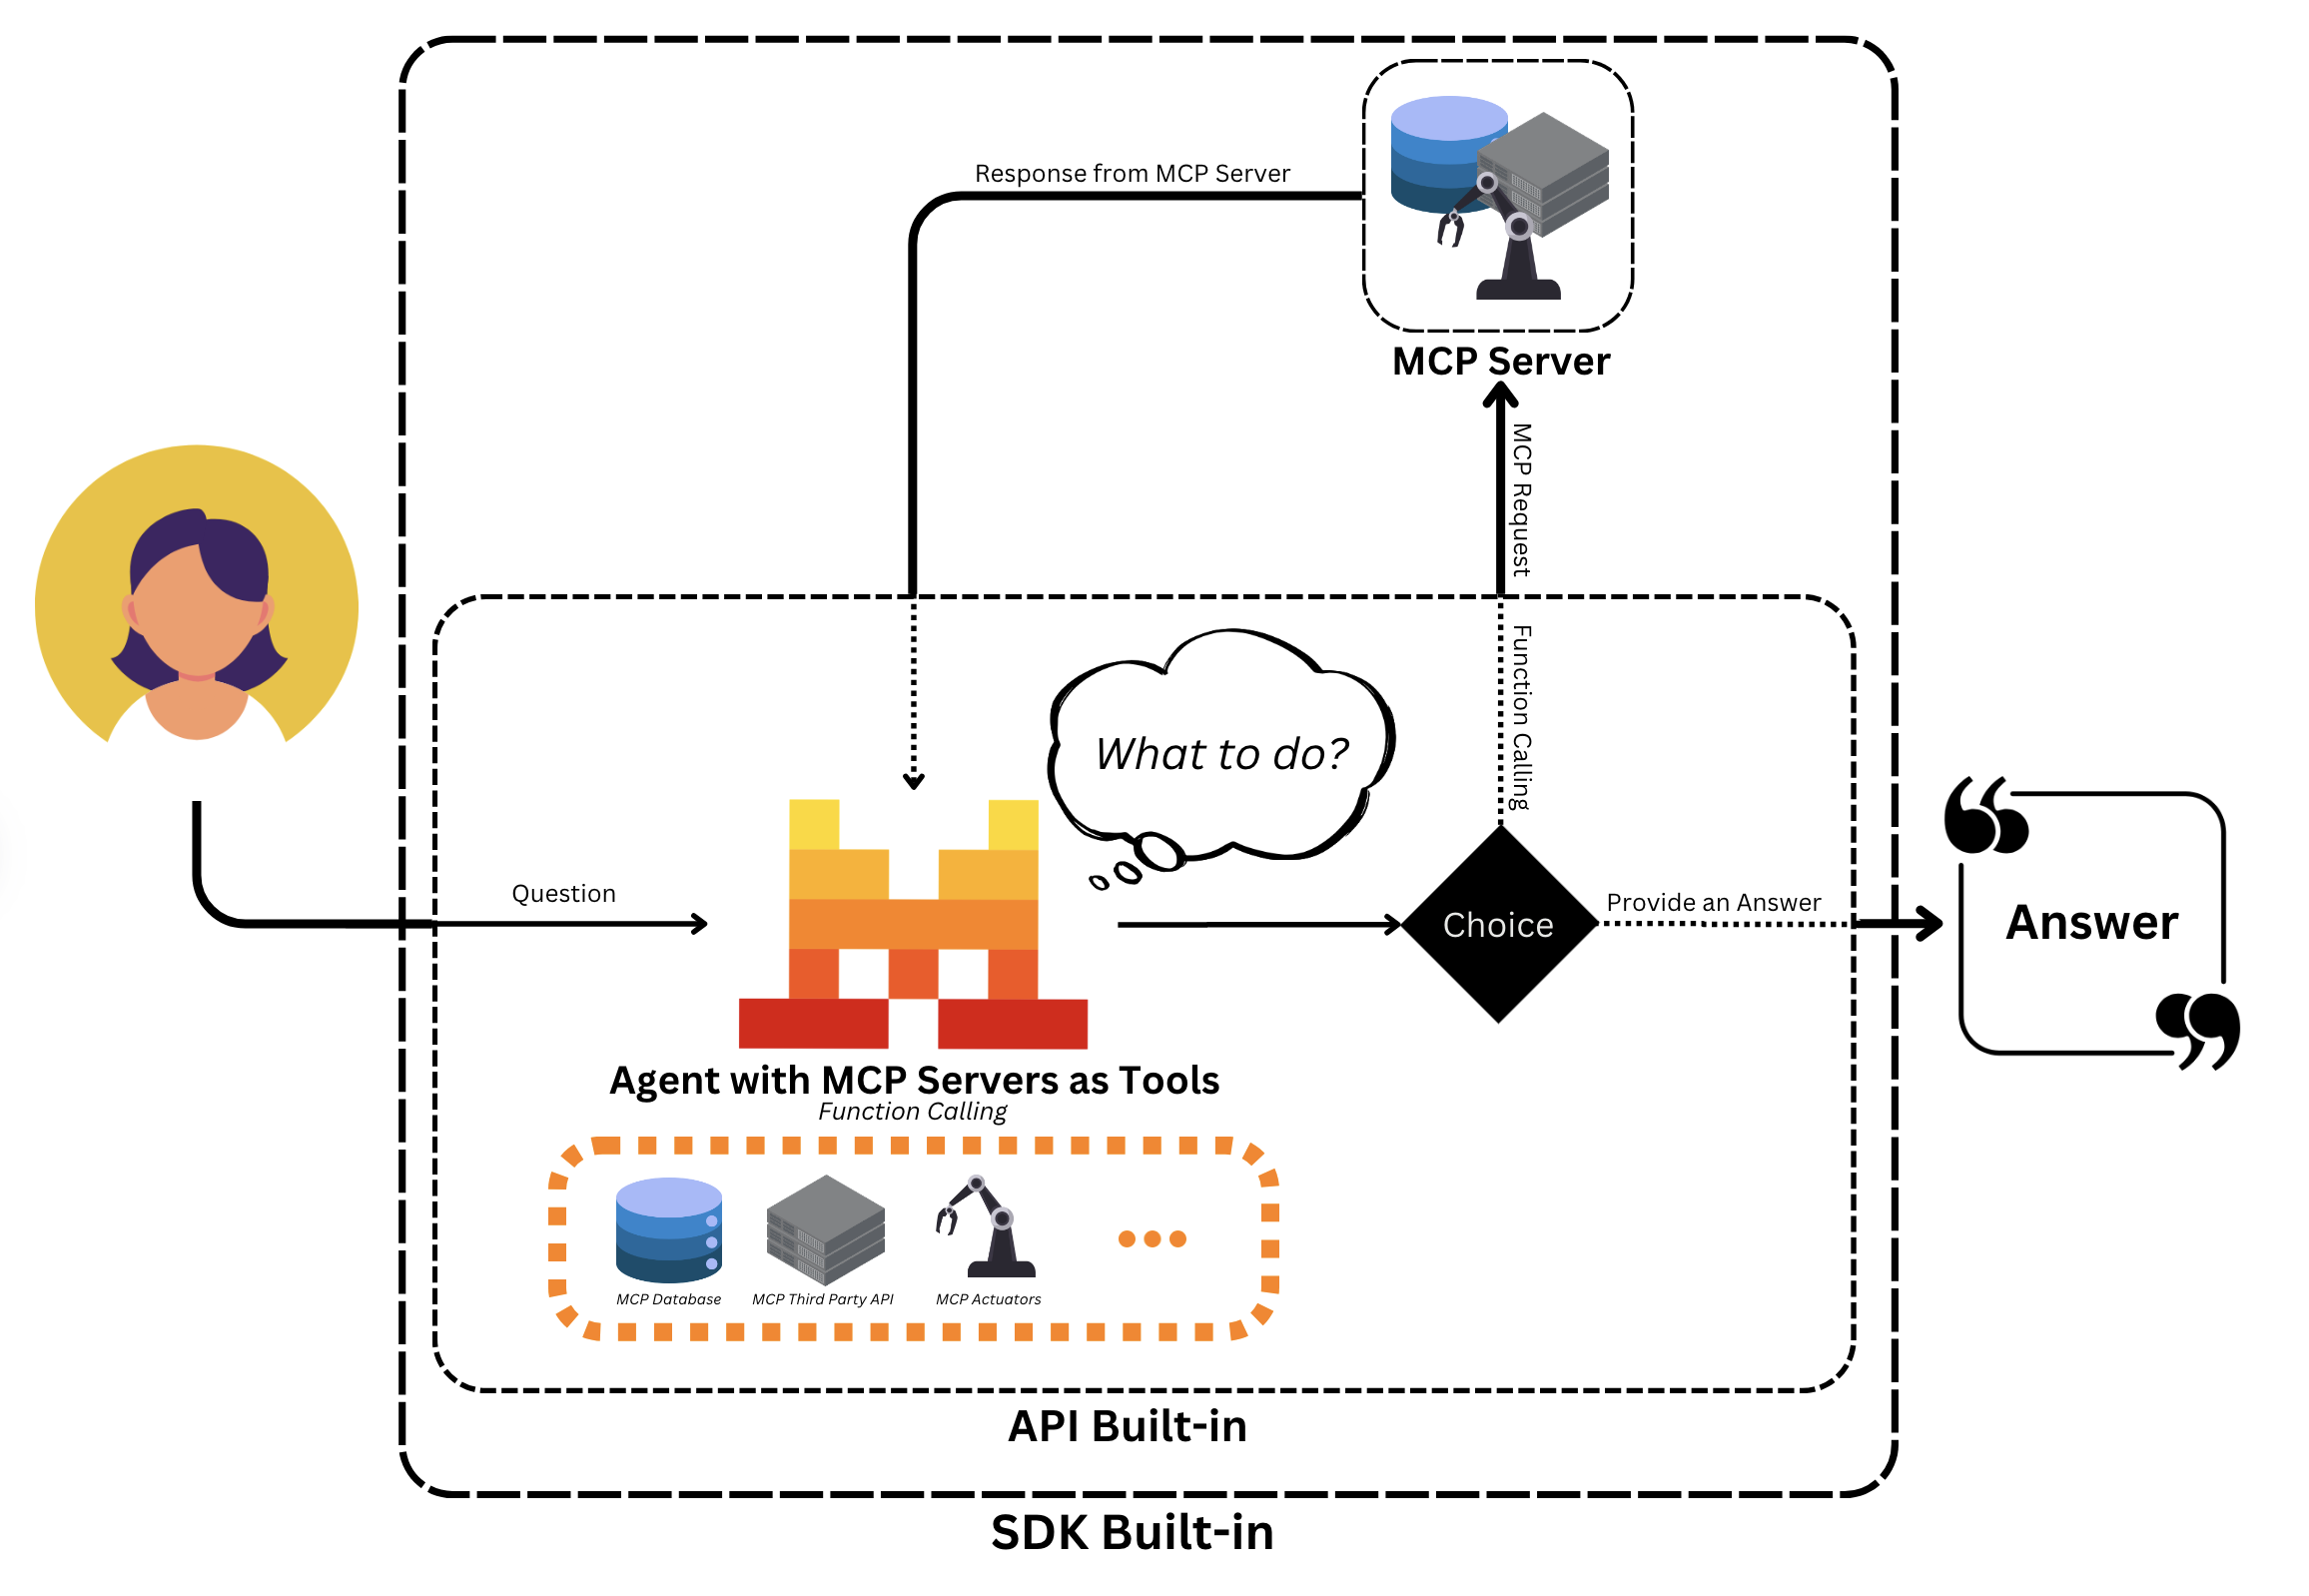
MCP
The Model Context Protocol (MCP) is an open standard designed to streamline the integration of AI models with various data sources and tools. By providing a standardized interface, MCP enables seamless and secure connections, allowing AI systems to access and utilize contextual information efficiently. It simplifies the development process, making it easier to build robust and interconnected AI applications.
By replacing fragmented integrations with a single protocol, MCP helps AI models produce better, more relevant responses by connecting them to live data and real-world systems.
For more information on configuring and deploying your own MCP Server, refer to the Model Context Protocol documentation.

Our Python SDK enables seamless integration of our agents with MCP Clients.
MCP Client Usage
- Local MCP Server
- Remote MCP Server
- Remote MCP Server with Auth
How to Use a Local MCP Server
Here is how to create an agent that uses a local MCP server to fetch weather information based on a user's location, combining MCP integration.
Step 1: Initialize the Mistral Client
First, we import everything needed. Most of the required modules are available with our mistralai
package, but you will also need mcp
. All the MCP Clients will be run asynchronously, so we will create an async main function where the main code will reside.
#!/usr/bin/env python
import asyncio
import os
from mistralai import Mistral
from mistralai.extra.run.context import RunContext
from mcp import StdioServerParameters
from mistralai.extra.mcp.stdio import MCPClientSTDIO
from pathlib import Path
from mistralai.types import BaseModel
# Set the current working directory and model to use
cwd = Path(__file__).parent
MODEL = "mistral-medium-latest"
async def main() -> None:
# Initialize the Mistral client with your API key
api_key = os.environ["MISTRAL_API_KEY"]
client = Mistral(api_key)
Step 2: Define Server Parameters and Create an Agent
We can now define the server parameters, which will point to a specific path. For more information, we recommend visiting the Model Context Protocol documentation. Once the server is defined, we can create our agent.
# Define parameters for the local MCP server
server_params = StdioServerParameters(
command="python",
args=[str((cwd / "mcp_servers/stdio_server.py").resolve())],
env=None,
)
# Create an agent to tell the weather
weather_agent = client.beta.agents.create(
model=MODEL,
name="weather teller",
instructions="You are able to tell the weather.",
description="",
)
Step 3: Define Output Format and Create a Run Context
The next step is to create a Run Context where everything will happen between the MCP Client and our Agent. You can also leverage structured outputs!
# Define the expected output format for weather results
class WeatherResult(BaseModel):
user: str
location: str
temperature: float
# Create a run context for the agent
async with RunContext(
agent_id=weather_agent.id,
output_format=WeatherResult,
continue_on_fn_error=True,
) as run_ctx:
Step 4: Register MCP Client
The next step is to create and register the MCP Client.
# Create and register an MCP client with the run context
mcp_client = MCPClientSTDIO(stdio_params=server_params)
await run_ctx.register_mcp_client(mcp_client=mcp_client)
You can also leverage the MCP Orchestration to use Function Calling locally directly.
import random
# Register a function to get a random location for a user, it will be an available tool
@run_ctx.register_func
def get_location(name: str) -> str:
"""Function to get location of a user.
Args:
name: name of the user.
"""
return random.choice(["New York", "London", "Paris", "Tokyo", "Sydney"])
# Create and register an MCP client with the run context
mcp_client = MCPClientSTDIO(stdio_params=server_params)
await run_ctx.register_mcp_client(mcp_client=mcp_client)
Step 5: Run the Agent and Print Results
Everything is ready; you can run our Agent and get the output results!
# Run the agent with a query
run_result = await client.beta.conversations.run_async(
run_ctx=run_ctx,
inputs="Tell me the weather in John's location currently.",
)
# Print the results
print("All run entries:")
for entry in run_result.output_entries:
print(f"{entry}")
print()
print(f"Final model: {run_result.output_as_model}")
if __name__ == "__main__":
asyncio.run(main())
How to Use a Remote MCP Server Without Authentication
Here is how to use a remote MCP server without authentication.
Step 1: Initialize the Mistral Client
First, we import everything needed. Most of the required modules are available with our mistralai
package. All the MCP Clients will be run asynchronously, so we will create an async main function where the main code will reside.
#!/usr/bin/env python
import asyncio
import os
from mistralai import Mistral
from mistralai.extra.run.context import RunContext
from mistralai.extra.mcp.sse import MCPClientSSE, SSEServerParams
from pathlib import Path
# Set the current working directory and model to use
cwd = Path(__file__).parent
MODEL = "mistral-medium-latest"
async def main():
# Initialize the Mistral client with your API key
api_key = os.environ["MISTRAL_API_KEY"]
client = Mistral(api_key)
Step 2: Define Server URL and Create MCP Client
Next, we define the URL for the remote MCP server and create an MCP client to connect to it.
# Define the URL for the remote MCP server
server_url = "https://mcp.semgrep.ai/sse"
mcp_client = MCPClientSSE(sse_params=SSEServerParams(url=server_url, timeout=100))
Step 3: Create a Run Context and Register MCP Client
We create a Run Context for the agent and register the MCP client with it.
# Create a run context for the agent
async with RunContext(
model=MODEL,
) as run_ctx:
# Register the MCP client with the run context
await run_ctx.register_mcp_client(mcp_client=mcp_client)
Step 4: Run the Agent and Print Results
Finally, we run the agent with a query and print the results.
# Run the agent with a query
run_result = await client.beta.conversations.run_async(
run_ctx=run_ctx,
inputs="Can you write a hello_world.py and check for security vulnerabilities",
)
# Print the results
print("All run entries:")
for entry in run_result.output_entries:
print(f"{entry}")
print()
print(f"Final Response: {run_result.output_as_text}")
if __name__ == "__main__":
asyncio.run(main())
How to Use a Remote MCP Server with Authentication
Here is how to use a remote MCP server with authentication.
Step 1: Initialize the Mistral Client
First, we import everything needed. Most of the required modules are available with our mistralai
package. All the MCP Clients will be run asynchronously, so we will create an async main function where the main code will reside.
#!/usr/bin/env python
import asyncio
from http.server import BaseHTTPRequestHandler, HTTPServer
import os
import threading
import webbrowser
from mistralai import Mistral
from mistralai.extra.run.context import RunContext
from mistralai.extra.mcp.sse import MCPClientSSE, SSEServerParams
from mistralai.extra.mcp.auth import build_oauth_params
# Set the model to use and callback port for OAuth
MODEL = "mistral-medium-latest"
CALLBACK_PORT = 16010
Step 2: Set Up Callback Server
We set up a callback server to handle OAuth responses.
def run_callback_server(callback_func):
# Set up a callback server to handle OAuth responses
auth_response: dict = {"url": ""}
class OAuthCallbackHandler(BaseHTTPRequestHandler):
server_version = "HTTP"
code = None
def do_GET(self):
if "/callback" in self.path:
try:
auth_response["url"] = self.path
self.send_response(200)
self.send_header("Content-type", "text/html")
self.end_headers()
callback_func()
response_html = "<html><body><p>You may now close this window.</p></body></html>"
self.wfile.write(response_html.encode())
threading.Thread(target=httpd.shutdown).start()
except Exception:
self.send_response(500)
self.end_headers()
server_address = ("localhost", CALLBACK_PORT)
httpd = HTTPServer(server_address, OAuthCallbackHandler)
threading.Thread(target=httpd.serve_forever).start()
redirect_url = f"http://localhost:{CALLBACK_PORT}/oauth/callback"
return httpd, redirect_url, auth_response
Step 3: Define Server URL and Create MCP Client
We define the URL for the remote MCP server and create an MCP client to connect to it.
async def main():
# Initialize the Mistral client with your API key
api_key = os.environ["MISTRAL_API_KEY"]
client = Mistral(api_key)
# Define the URL for the remote MCP server
server_url = "https://mcp.linear.app/sse"
mcp_client = MCPClientSSE(sse_params=SSEServerParams(url=server_url))
Step 4: Handle Authentication
We handle the authentication process, including setting up a callback event and event loop, checking if authentication is required, and managing the OAuth flow.
# Set up a callback event and event loop
callback_event = asyncio.Event()
event_loop = asyncio.get_event_loop()
# Check if authentication is required
if await mcp_client.requires_auth():
# Set up a callback server and handle OAuth flow
httpd, redirect_url, auth_response = run_callback_server(
callback_func=lambda: event_loop.call_soon_threadsafe(callback_event.set)
)
try:
# Build OAuth parameters and get the login URL
oauth_params = await build_oauth_params(
mcp_client.base_url, redirect_url=redirect_url
)
mcp_client.set_oauth_params(oauth_params=oauth_params)
login_url, state = await mcp_client.get_auth_url_and_state(redirect_url)
# Open the login URL in a web browser
print("Please go to this URL and authorize the application:", login_url)
webbrowser.open(login_url, new=2)
await callback_event.wait()
# Exchange the authorization code for a token
mcp_client = MCPClientSSE(
sse_params=SSEServerParams(url=server_url),
oauth_params=oauth_params,
)
token = await mcp_client.get_token_from_auth_response(
auth_response["url"], redirect_url=redirect_url, state=state
)
mcp_client.set_auth_token(token)
except Exception as e:
print(f"Error during authentication: {e}")
finally:
httpd.shutdown()
httpd.server_close()
Step 5: Create a Run Context and Register MCP Client
We create a Run Context for the agent and register the MCP client with it.
# Create a run context for the agent
async with RunContext(
model=MODEL,
) as run_ctx:
# Register the MCP client with the run context
await run_ctx.register_mcp_client(mcp_client=mcp_client)
Step 6: Run the Agent and Print Results
Finally, we run the agent with a query and print the results.
# Run the agent with a query
run_result = await client.beta.conversations.run_async(
run_ctx=run_ctx,
inputs="Tell me which projects do I have in my workspace?",
)
# Print the final response
print(f"Final Response: {run_result.output_as_text}")
if __name__ == "__main__":
asyncio.run(main())
Streaming Conversations
Streaming conversations with an agent using a local MCP server is similar to non-streaming, but instead of waiting for the entire response, you process the results as they arrive.
Here is a brief example of how to stream conversations:
# Stream the agent's responses
events = await client.beta.conversations.run_stream_async(
run_ctx=run_ctx,
inputs="Tell me the weather in John's location currently.",
)
# Process the streamed events
run_result = None
async for event in events:
if isinstance(event, RunResult):
run_result = event
else:
print(event)
if not run_result:
raise RuntimeError("No run result found")
# Print the results
print("All run entries:")
for entry in run_result.output_entries:
print(f"{entry}")
print(f"Final model: {run_result.output_as_model}")